Adding a Twitter feed to your website of WordPress site is a common request made to theme developers and web designers.
This simple tutorial will show you exactly how to add a Twitter feed displaying your “Latest Tweets” onto your website using a handy plugin called Tweet.js.
To output a Twitter feed on our website, we need to follow five (simple) steps:
- Download the
Tweet.jsplugin from GitHub. - Create our own REST API (v1.1) Twitter application.
- Configure the
index.phpfile with our API credentials. - Upload our configured files to our web host.
- Add
<header>code to our template or theme.
Step 1: Download the Tweet.js plugin. You can download this plugin from the GitHub repository and unzip the files.
Step 2: Create a Twitter Application. First part here involves logging into your Twitter account and setting up a Twitter API for your application. After you have logged in, you will be shown the following page below. Create a new application by filling the required fields.
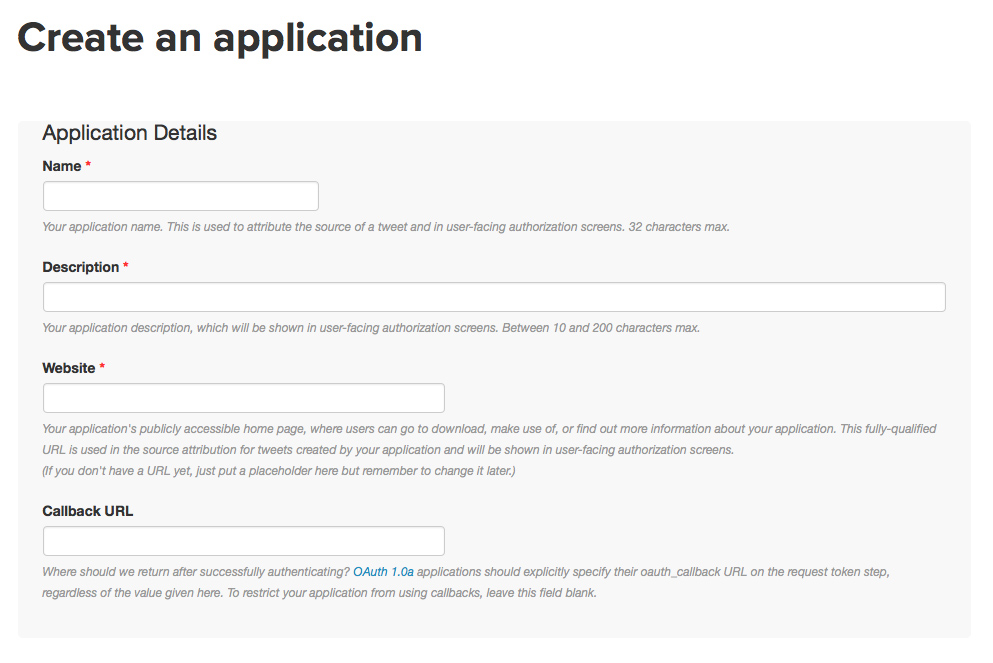
After you have logged in, you will be shown the page above.
Name: “Your application name”. This is used to attribute the source of a tweet and in Twitter’s user-facing authorization screens. You can use 32 characters as a maximum. While this field can be anything you want, try not to use generic names like “Latest Tweets”.
Description: “Your application description.” This will also be shown in Twitter’s user-facing authorization screens. Between 10 and 200 characters as a maximum. – Again, this can be anything you want, but try to avoid generic terms and descriptions.
Website: “Your full website URL.” This is your Twitter application’s publicly accessible home page, where users can go to download, make use of, or find out more information about your application. This fully-qualified URL is used in the source attribution for tweets created by your application and will be shown in user-facing authorization screens.
While you can enter any website you like here, it makes sense to sue the same website you are using to display your Twitter feed. Make sure to include the http:// part of the URL otherwise you will see an error message.
Callback URL: You can leave this field blank. Just agree to Twitter’s terms and conditions, enter the Captcha code, and then click the “Create your Twitter application” button.
Step 2 (Continued): Configure Our Twitter Application. This part of step two is really important and one of the reasons some users have trouble installing this plugin. You need to configure the new application to have the “Read, Write and Access direct messages” permissions.
You should see that your new application a current permission setting under the “Access Level” set to “Read-only” If you do not change this setting to “Read, Write and Access direct messages,” the plugin will not work.
To configure the correct setting, simply scroll back up to the top of the page and click the “Settings” tab. Scroll down to the middle of the page until you reach the “Application Type” area that should look like the screen shown below.
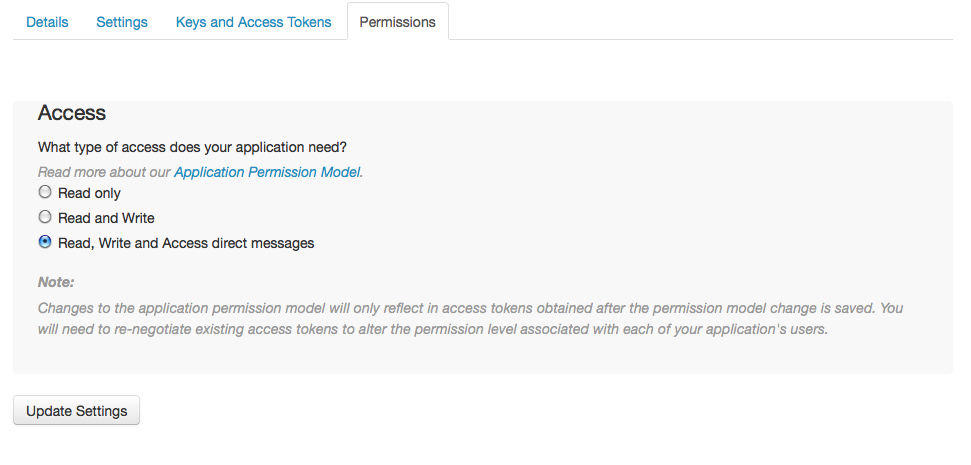
Configure the application to “Read, Write and Access direct messages.”
Check the box next to “Read, Write and Access direct messages”, then simply scroll down to the bottom of the page and click the “Update this twitter application’s settings” button.
Once you have done so, navigate back to the “Details” tab and confirm that your new Twitter application has been updated to the permission level underneath the “OAuth settings” area to “Read, write, and direct messages.”
Step 2 (Continued): Create Your Access Token. The final step is to create an “Access Token” for your new Twitter application. Under the “Details” tab, simply scroll down to the bottom of the page and click the “Create my access token” button. If you have completed the steps above correctly, your “Access Token” should have the access level of “Read, write, and direct messages.”
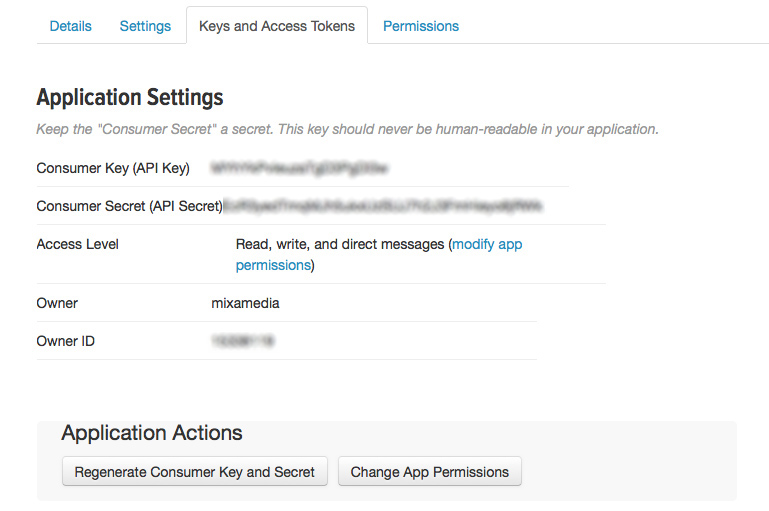
Create an “Access Token” for your new Twitter application
Step 3: Configure the Tweet.js index.php file. After creating your new Twitter application and “Access Token”, you will need to configure index.php with your OAuth credentials. Inside the “twitter” folder, open the index.php file and enter your application OAuth credentials in the fields provided.
// Your Twitter App Consumer Key
private $consumer_key = 'YOUR_CONSUMER_KEY';

// Your Twitter App Consumer Secret
private $consumer_secret = 'YOUR_CONSUMER_SECRET';

// Your Twitter App Access Token
private $user_token = 'YOUR_ACCESS_TOKEN';

// Your Twitter App Access Token Secret
private $user_secret = 'YOUR_ACCESS_TOKEN_SECRET';

// Path to tmhOAuth libraries
private $lib = './lib/';

// Enable caching
private $cache_enabled = true;

// Cache interval (minutes)
private $cache_interval = 15;

// Path to writable cache directory
private $cache_dir = './cache/';
Note that the default setting for the plugin’s cache directory is set to “true.” If you do not want to cache your Twitter feed, then simply change this field to read “false.” If you leave the setting as “true”, you will need make sure your cache directory is writable. Learn more about setting file permissions here.
Step 4: Upload all files to our web host. Once you have configured your index.php file, simply upload all the Tweet.js files in the “twitter” folder to your web host.
You can easily upload the files to your web host using an FTP client like FileZilla, Cyberduck, or Transmit.
Step 5: Add <header> code to template or theme. Once you have the files accessible, the last step includes adding the required scripts to out document <header>.
1. Include JQuery. In these examples, we use Google’s AJAX Libraries API.
2. Include jQuery and jquery.tweet.js files in your template’s <header> as shown below.
<script language="javascript" src="https://ajax.googleapis.com/ajax/libs/jquery/1.6.4/jquery.min.js" type="text/javascript"></script>
<script language="javascript" src="/tweet/jquery.tweet.js" type="text/javascript"></script>
Also inside the <head>, You will need to initialize tweet.js with jQuery using this script shown with your own Username and other custom options.
<script type='text/javascript'>
   jQuery(function($){
   $(".tweet").tweet({
   join_text: "auto",
   username: "TwitterUsername",
   avatar_size: 32,
   count: 3,
   loading_text: "loading tweets..."
    });
 });
</script>
3. Inside your template’s <body>, include a placeholder for your displaying your tweets.
<div class="tweet"></div>
Finally, include your stylesheet in <head>, and simply modify to suit the look and feel of your own website.
<link href="jquery.tweet.css" media="all" rel="stylesheet" type="text/css"/>
If you are using a WordPress theme, you can include the following code inside your theme template’s function.php file. The code below will load the jQuery files and the required tweet.css stylesheet using the WordPress wp_enqueue function.
/**
 * Load Tweets scripts and styles
 */
function tweets_enqueue_scripts() {
wp_enqueue_style( 'tweets-style', get_template_directory_uri().'/inc/twitter/jquery.tweet.css') );
wp_enqueue_script('tweets-twitterjs', get_template_directory_uri().'/inc/twitter/jquery.tweet.js', array('jquery') );
wp_enqueue_script('tweets-jquery', 'http://ajax.googleapis.com/ajax/libs/jquery/1.11.1/jquery.min.js');
}

add_action( 'wp_enqueue_scripts', 'tweets_enqueue_scripts' );
You can remove the CSS file from the functions.php code above, and simply add the CSS directly to your WordPress theme’s style.css file if you prefer. If you follow all the above steps, and include the required files in your theme or template, you should now be able see your “Latest Tweets” displayed on your own page or website.
There are so many ways that you can customize the look your Twitter feed using CSS, that we will leave the fine tuning up to you and your own design needs.
Update: If you want a simpler way to embed a Twitter timeline on your website, Twitter has created a new publishing tool that makes it a lot easier. You can now embed your Twitter feed in a grid, tweet, or timeline format.
More Resources
- Building With the Twitter API: Getting Started
- So you want to use the Twitter v1.1 API?
- How To Create A Twitter Widget
- Embedding Twitter timelines just got a lot easier